Recent Updates
Our library system receives regular enhancements that will improve functionality and user experience.
Refer to this tab regularly for updates.
Select an update below to jump directly to that update.
Social Network Login
With a social network login, non-USC users with active library borrowing privileges (including alumni, Friends of the USC Libraries, fee-based borrowers, and other non-USC guests) can create and access their library account to check due dates, renew books, or page items from the Grand Depository. To complete the process, users will need to link their library accounts to their Facebook or Google profiles. Once registered, users should select the "social network" option the next time they're asked to sign-in for library services. USC students, faculty, and staff, should continue to login as they always have using their USC IDs and passwords.

For questions about this service or for help, please contact the Doheny Memorial Library at dmlnotes@usc.edu or the Norris Medical Library at 323-422-1116.
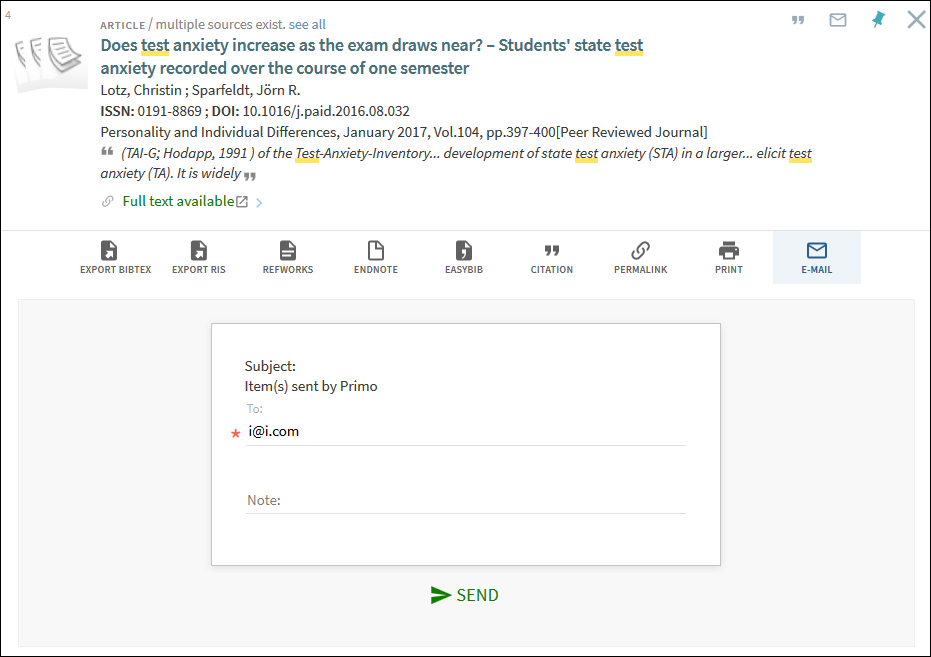
Email Security
This enhancement improves the security of emails sent from the library's website.
Only signed-in users are permitted to add a note to the email.
Signed-in users can specify 1 to 10 email addresses (which must be separated by a semicolon), but un-signed users are limited to a single email address. As an email address is added, the system validates its format.
The subject of the email cannot be modified.
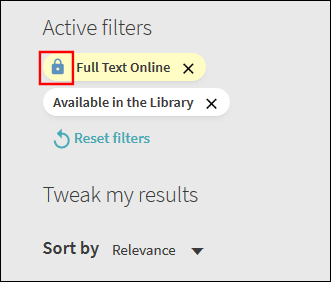
Sticky Filters
Make an active filter persistent for an entire session. This allows you to make changes to your search terms while still keeping your filters applied. Your filters will not reset if you make changes to or start a new search. To make a filter persistent, hover the cursor over the filter in the Active filters section and then click the filter's padlock  .
.
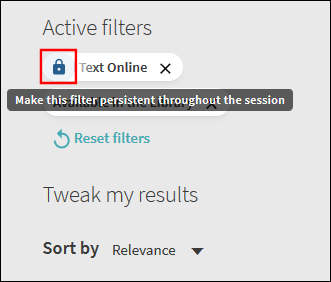
To remove a filter's persistence, click the filter's padlock  . You can also remove a sticky filter by deleting the filter or resetting all filters.
RSS Feeds
A Rich Site Summary (RSS) feed allows you to be informed of updates to records in your saved searches.
-
Open the My Favorites page by clicking the My Favorites (push pin) button in the top menu.
-
On the My Favorites page, select the Saved Searches tab.

-
Click the RSS button
 for the saved search that you want to monitor.
 -
Subscribe to the feed if your browser has an RSS reader.
Multiple Filter Selection
-
Perform a search.

-
For each filter that you want to include and exclude, hover over the filter in the Refine my results section and then perform one of the following actions:
-
Include filter – Select the check box on the left side of the filter. If you want to include a filter that has already been marked for exclusion, click the
 button on the right side of the filter.
 -
Exclude filter – If you have already included a filter, click the
 button on the right side of the filter to mark it for exclusion. If you have not already marked a filter for exclusion or inclusion, you must first select the filter's check box and the click the button on the right side of the filter. Otherwise, a single filter will be excluded immediately.
-
-
Click Apply Filters to filter your results. The selected filters will appear in the Active filters section.


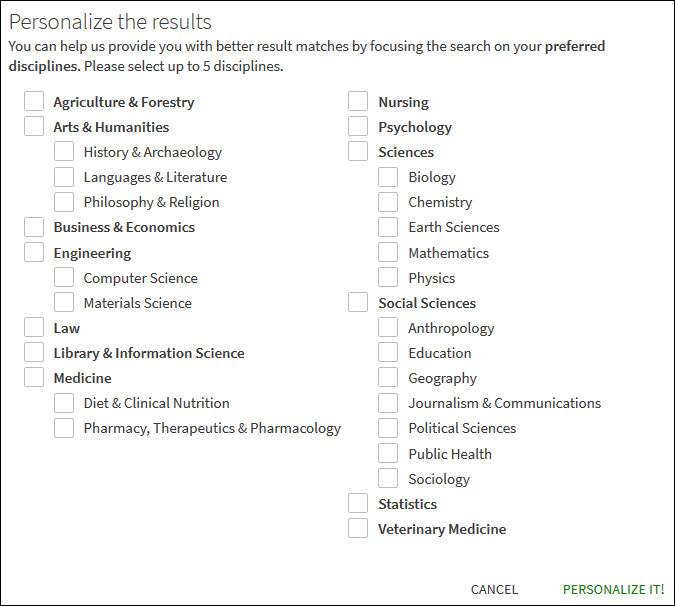
Personalized Results
The Personalized Results feature boosts the rankings of records that match your personalized settings. The Personalized results section lists the active preferences and allows you to remove selected disciplines, edit selected disciplines, and give preference to newer material.

Setting the Personalized Results Preferences
-
Perform a search.
-
Click the Personalize button that appears above the list of results.
-
In the Personalize the results dialog box, select up to five disciplines.
-
Click PERSONALIZE IT.
-
Perform a search to display the Personalized results section.
-
If you want to give preference to newer records, select the Prefer new material check box.
-
Click Edit in the Personalize the results section to open the Personalize the results dialog box.
-
In the Personalize the results dialog box, select up to five disciplines.
-
Click SAVE CHANGES.
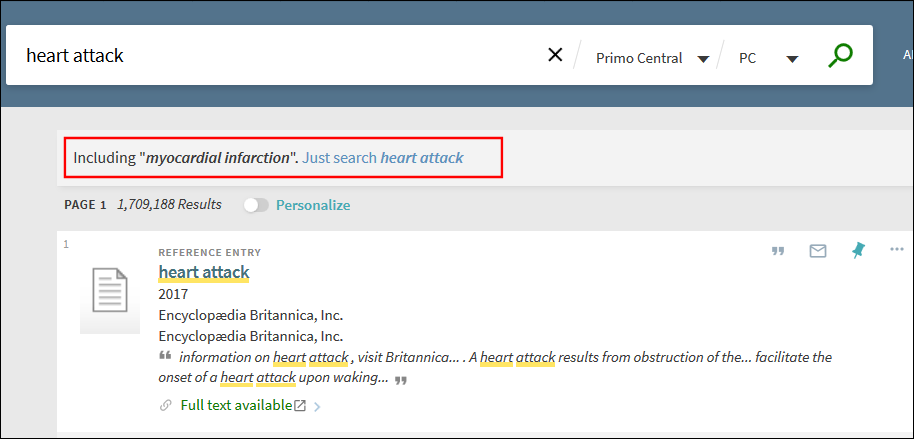
Search Expansion with Controlled Vocabulary
This feature expands your search with words and phrases that constitute variations of the search term with the same meaning and thereby increases the accuracy of your search. The expansions are visible on the screen and add, for example, variations of the search term with the same meaning (example ADHD and attention deficit disorder, or name variations such as assata shakur and asata shakur). You are provided with the option to revert to using only your original search term. This feature is based on vocabularies such as LC subjects and MeSH.
For example, if you enter heart attack in the search query, the system also returns results that include myocardial infarction. If you are interested only in results that include heart attack, you can click the link to the right of the recommendation.
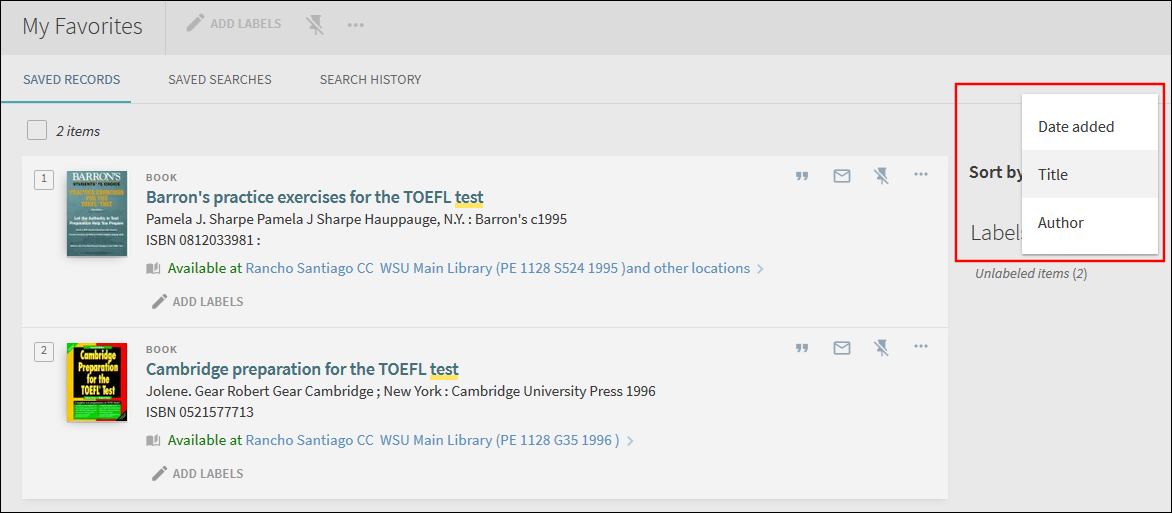
Sort in Favorites